Android 颜色选择的实现
<
div id=”content” contentScore=”2117″>在Api Demo里面有一个叫ColorPickerDialog的对话框,该对话框扩展了Dialog 的功能,使其具备颜色选择器的功能。具体可以参考Api Demo源代码,路径为:Android-sdk-windowssamplesandroid-7ApiDemossrccom exampleandroidapisgraphicsColorPickerDialog.java
本功能是基于上述的颜色选择器对话框进行扩展,模仿PreferceActivity 组件的实现方式,新建一个名为ColorPickerPreference 的类使其继承自DialogPreference 并实现其内部功能菜单,如图:
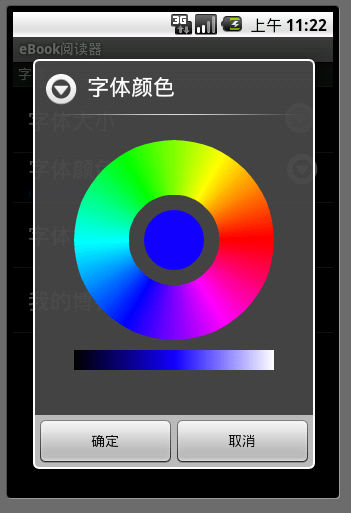
在Api Demo里面的颜色选择器是不具备有黑色和白色的选择的,这里我们虽然使用api Demo 里面的颜色选择器但其内部我们稍稍改造了一下。使其支持黑色和白色的选择,如上图中间的一条颜色条,头部和尾部分别代表黑色和白色。
为了显示的友好性,如果用户选择了颜色应该应该会有一个内容窗口或者一个文本对用户的选择做出相应的预览效果,。我们这里使用了一个TextView 做为颜色的预览效果,我们知道,Preference 的summary 只支持字符串的操作,类似下面的图:

如上图,只支持类型类型为CharSequence和字符所在的资源ID位置,那么我们这里如何使其支持颜色的显示和动态更换颜色呢?
这一切都在神奇的回调函数,onCreateView 里面这个方法先于 onBindView 执行,在里面初始化视图并且返回视图。具体处理见下面代码:
- @Override
- protected View onCreateView(ViewGroup parent) {
- // TODO Auto-generated method stub
- View view=LayoutInflater.from(getContext()).inflate(
- R.layout.preference, null);
- TextView title = (TextView) view.findViewById(R.id.title);
- title.setText(getTitle());
- summary = (TextView) view.findViewById(R.id.summary);
- summary.setText(getSummary());
- SharedPreferences prefs = getPreferenceManager().getSharedPreferences();
- mInitialColor = prefs.getInt(getKey(), Color.LTGRAY);
- summary.setTextColor(mInitialColor);
- return view;
- }
上面代码,我们通过LayoutInflater 函数引入一个外部的布局文件,然后设置其title 和summary 并初始其颜色,通过SharedPreferences 类调用保存后的颜色值,布局文件如下:
- “1.0” encoding=“UTF-8”?>
- android:layout_width=“fill_parent” android:layout_height=“fill_parent”
- xmlns:android=“http://schemas.android.com/apk/res/android”>
-
- android:gravity=“center” android:layout_height=“fill_parent”>
-
- android:layout_marginLeft=“15dp” android:textAppearance=“?android:attr/textAppearanceLarge”
- android:layout_height=“wrap_content”>
-
- android:layout_marginRight=“15dp” android:layout_alignParentRight=“true”
- android:layout_width=“wrap_content” android:layout_height=“wrap_content”>
-
- android:layout_marginLeft=“15dp” android:layout_width=“wrap_content”
- android:layout_height=“wrap_content”>
实始化对话框的回调函数里面我们为其添加一个ColorPickerDialog 本身的颜色改变的事件监听并为其初始化颜色值,代码如下:
- @Override
- protected void onPrepareDialogBuilder(Builder builder) {
- super.onPrepareDialogBuilder(builder);
- OnColorChangedListener l = new OnColorChangedListener() {
- public void colorChanged(int color) {
- mCurrentColor = color;
- onDialogClosed(true);
- getDialog().dismiss();
- }
- };
- LinearLayout layout = new LinearLayout(getContext());
- layout.setPadding(20, 20, 20, 20);
- layout.setOrientation(LinearLayout.VERTICAL);
- mCPView = new ColorPickerView(getContext(), l, mInitialColor);
- LinearLayout.LayoutParams params1 = new LinearLayout.LayoutParams(
- LinearLayout.LayoutParams.WRAP_CONTENT,
- LinearLayout.LayoutParams.WRAP_CONTENT);
- params1.gravity = Gravity.CENTER;
- mCPView.setLayoutParams(params1);
- layout.addView(this.mCPView);
- layout.setId(android.R.id.widget_frame);
- builder.setView(layout);
- }
当对话框关闭时,即选择完颜色后,我们就要马上回去更新文本的颜色和将颜色值保存到键值里面,代码如下:
- @Override
- protected void onDialogClosed(boolean positiveResult) {
- if (positiveResult) {
- mCurrentColor = mCPView.getColor();
- summary.setTextColor(mCurrentColor);
- SharedPreferences.Editor editor = getEditor();
- editor.putInt(getKey(), mCurrentColor);
- editor.commit();
- callChangeListener(new Integer(mCurrentColor));
- }
- }
通过重写,onDialogClosed 回调函数,到这一步整个的封装就己结束,在XML可以通过如下使用
- android:key=“colorpiker” android:persistent=“true” android:summary=“@string/app_name”
- android:di
About The Author
bjmayor
程序员,码农,php,python,ios,android,go,产品经理,创业。