Linux 定时任务 crontab 和 Systemd Timer 详解-演道网
一、说说八卦
说到定时任务,我们常用的就是 crond 服务,但是我们不知道还有另外一种定时方式,那就是 systemd,我们常用 systemd 来管理我们的服务,但是我们却不知道,我们还可以通过 systemd 来设置定时任务。本文将记录下 crond 服务和 systemd服务来设置定时任务。 (at 命令使用较少,在此未记录)
二 、crond服务
我们常用的定时任务就是 crond 服务,crontab 是crond 服务的常用命令,我们经常通过该服务来定时或者周期性帮我们执行一些任务。
crond 服务的一些基本概念
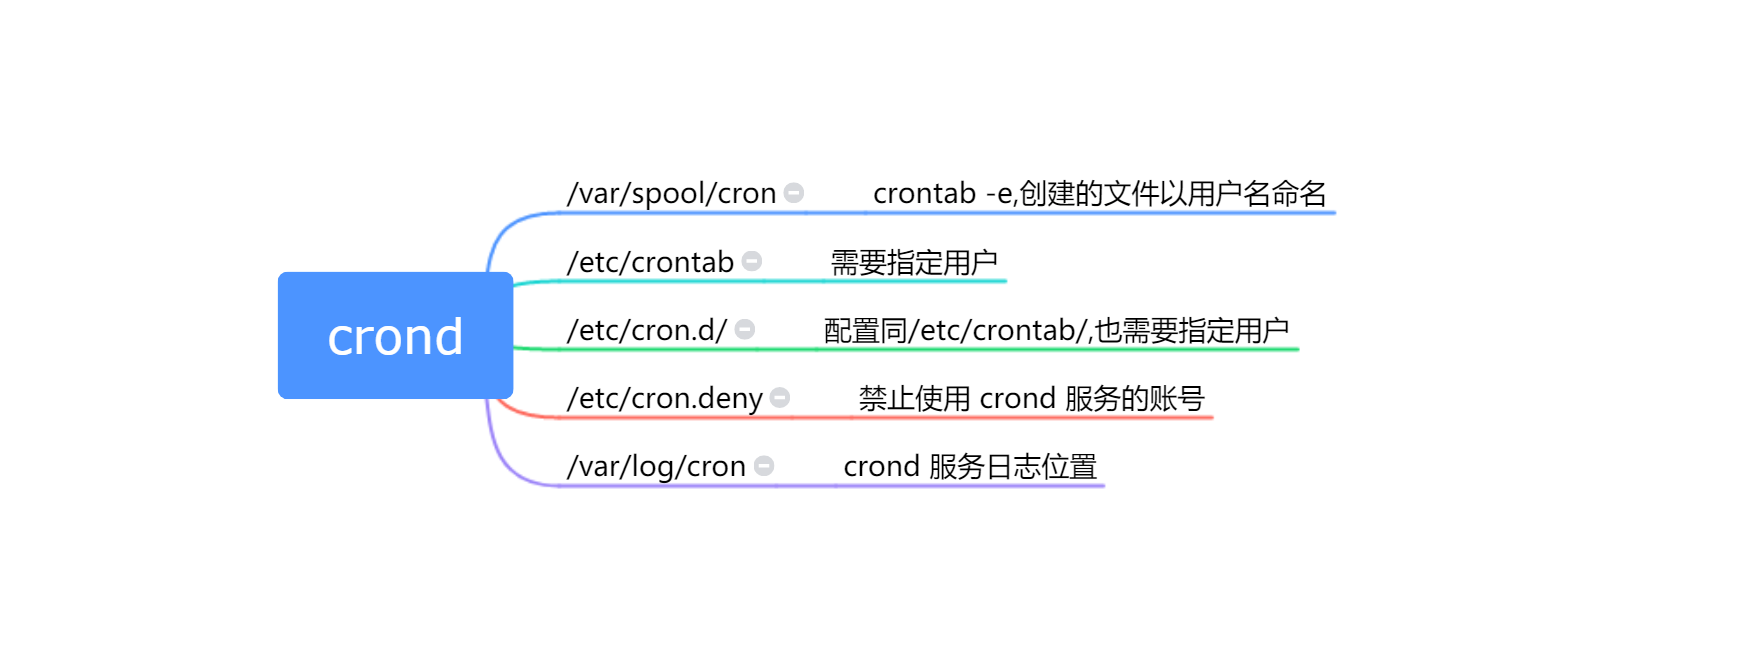
crond 读取配置文件会从以下几个路径读取:
/var/spool/cron/, 由crontab -e进行写入,配置文件无需指定用户/etc/crontab,只能root进行编辑,配置文件需指定用户/etc/cron.d/,在此文件夹下创建定时任务文件,配置文件需指定用户
crond 服务的常用文件:
-
/var/spool/cron/ -
/etc/crontab -
/etc/cron.d/ -
/var/log/cron# crond 服务日志位置 -
/etc/cron.deny# 禁止使用 crond 服务的账号,默认创建的用户是允许使用 crond 服务的。要禁止某个用户,就直接将该用户名写入该文件
crontab 常用命令
# 查看当前的 crontab 任务
crontab -l
# 编辑 crontab 任务,不符合规则的任务会报错。
crontab -e
# 帮助其他用户查看/编辑 crontab 任务,只有 root 用户才可以使用。
crontab -u username -l # 查看
crontab -u username -e # 编辑
# 删除所有的 crontab 任务
crontab  -r
# crond 服务状态
systemctl status  crond
# crond 服务启动/暂停/重启
systemctl start/stop/reload  crond
crontab 定时任务基本语法
# Example of job definition:
# .---------------- minute (0 - 59)
# |  .------------- hour (0 - 23)
# |  |  .---------- day of month (1 - 31)
# |  |  |  .------- month (1 - 12) OR jan,feb,mar,apr ...
# |  |  |  |  .---- day of week (0 - 6) (Sunday=0 or 7) OR sun,mon,tue,wed,thu,fri,sat
# |  |  |  |  |
# *  *  *  *  *   command to be executed
| 字符 | 含义 |
|---|---|
| * | 任何时刻,放在分钟位置上就表示每分钟。放在小时位置就表示每小时。 |
| , | 分割时段,比如要在3点和6点都执行,就可以写 3,6 |
| – | 表示一个区间,比如要1点到5点的20分都执行任务,20 1-5 * * * command |
| /n | n代表的是数字,表示每隔 n 个时间执行一次。 比如要每2分钟执行任务,*/2 * * * * command |
crontab -e (/var/spool/cron) 配置
crontab -e 命令是会检查语法的,语法错误的话,是会不通过的,crontab -e 保存在 /var/spool/cron 文件夹下,并且是以创建用户命名的,比如我们root 用户创建的定时任务就是保存在 `/var/spool/cron/root
crontab 使用示例:
以下命令都是通过crontab -e 进行编辑的
-
要在每天23点10分和1点10分对数据库进行备份,数据库备份脚本为
/opt/scripts/back.sh。10 23,1 * * * /opt/scripts/back.sh -
要在 0点到6点 每隔2小时 对数据库进行备份,数据库备份脚本为
/opt/scripts/back.sh0 0-6/2 * * * /opt/scripts/back.sh
/etc/crontab 配置
/etc/crontab 的语法格式和 crontab -e 大致相同,前者需要指定用户,后者不需要。
SHELL=/bin/bash
PATH=/sbin:/bin:/usr/sbin:/usr/bin
MAILTO=root # 指的就是当有 stdout 和 stderr 时,发送mail 给谁,默认是root,我们可以指定我们的e-mail账号,但是前提要在本地配置好邮件发送账号
*  *  *  *  * user-name  command to be executed
#示例:25-32/2 * * * * root  /opt/test.sh
/etc/cron.d/ 配置
在 /etc/cron.d/下创建一个文件,文件配置和/etc/crontab 是一样的,需要指定用户。
注意点:
在 Linux 底下的 crontab 會自動的幫我們每分鐘重新讀取一次 /etc/crontab 的例行工作事項,但是某些原因或者是其他的 Unix 系統中,由於 crontab 是讀到記憶體當中的,所以在你修改完 /etc/crontab 之後,可能並不會馬上執行, 這個時候請重新啟動 crond 這個服務吧!『systemctl restart crond』
我们在设置计划任务时需要注意一个问题,就是 如果我们设置了月日,就不要设置星期,这两者是冲突的,只能同时存在一个。
* 15 * * 1-5 /usr/local/bin/tea_time.sh该脚本表示,每周一到周五下午3点,3点的每分钟执行一次脚本
/usr/local/bin/tea_time.sh
三 、systemd 服务
之前对于systemd 具有定时任务的功能还是只有耳闻,并没有实际操作过,今天进行实际操作了下,发现也不错的。
systemd 实际是通过定义一个timer单元来创建一个定时任务。它包含了两大内容,首先定义一个service单元,这个service单元定义了我们想定时执行的任务。然后再定义一个timer单元,通过timer单元定义定时规则去执行之前的service单元。
1. 创建定时脚本
首先我们创建一个脚本叫做 now_time.sh,脚本内容就是输出当时的时间:
cat </opt/now_time.sh
#!/bin/bash
echo "$(date)" >>/tmp/time_record.log
EOF
chmod 755 /opt/now_time.sh  # 注意一定要更改权限,否则后面会由于没有执行权限而报错
2. 创建 Service 单元
然后需要创建一个 Service单元 timerecord
cat </usr/lib/systemd/system/timerecord.service
[Unit]
Description=now time service

[Service]
ExecStart=/opt/now_time.sh

[Install]
WantedBy=multi-user.target
EOF
然后把 timerecord 作为系统服务。
systemctl start timerecord
3. 创建 Timer 单元
在创建 Timer单元前,我们需要先了解下如何配置 Timer,
[Unit] # 定义元数据
[Timer] #定义定时器
OnActiveSec:定时器生效后,多少时间开始执行任务
OnBootSec:系统启动后,多少时间开始执行任务
OnStartupSec:Systemd 进程启动后,多少时间开始执行任务
OnUnitActiveSec:该单元上次执行后,等多少时间再次执行
OnUnitInactiveSec: 定时器上次关闭后多少时间,再次执行
OnCalendar:基于绝对时间,而不是相对时间执行,用于和 crond 类似的定时任务 ,以实际时间执行。
AccuracySec:如果因为各种原因,任务必须推迟执行,推迟的最大秒数,默认是60秒
Unit:真正要执行的任务,默认是同名的带有.service后缀的单元
Persistent:如果设置了该字段,即使定时器到时没有启动,也会自动执行相应的单元
WakeSystem:如果系统休眠,是否自动唤醒系统
示例:
-
在系统启动15分钟后启动,并在系统运行时,每周启动一次。
[Unit] Description=Run foo weekly and on boot [Timer] OnBootSec=15min OnUnitActiveSec=1w [Install] WantedBy=timers.target -
每周执行一次(周一凌晨0点)。激活后,如果错过了上次启动时间,,它会立即触发服务,例如由于系统断电:
[Unit] Description=Run foo weekly [Timer] OnCalendar=weekly Persistent=true [Install] WantedBy=timers.target -
每天周一下午3点10分运行
如果需要具体的时间,我们可以给
OnCalendar设定具体时间值,形如Year-Month-Day Hour:Minute:Second[Unit] Description=Run timerecord on Monday 3:10 [Timer] OnCalendar=Mon *-*-* 15:10:00 Unit=timerecord [Install] WantedBy=timers.target -
每隔5秒执行一次
[Unit] Description=Run timerecord every 5s [Timer] OnUnitActiveSec=5s # 可以设置为 5m,1h Unit=timerecord [Install] WantedBy=timers.target -
每个小时的每隔10分钟 进行备份服务
[Unit]
Description=backup

[Timer]
OnCalendar=*-*-* 0/1:0/10:00
Unit=backup

[Install]
WantedBy=multi-user.target
创建 Timer 单元 record:每隔1分钟执行一次
cat < /usr/lib/systemd/system/timerecord.timer
[Unit]
Description=Run timerecord  every 5s

[Timer]
OnUnitActiveSec=1m # 可以设置为 5m,1h
Unit=timerecord #指定 Service 服务名

[Install]
WantedBy=timers.target
EOF
启用定时任务
systemctl  daemon-reload  #重新加载配置
systemctl  start  timerecord.timer # 启动定时任务
常用命令:
systemctl  start  timerecord.timer# 启动定时任务
systemctl  stop  timerecord.timer# 暂停定时任务
systemctl  status  timerecord.timer# 查看定时任务服务状态
systemctl  restart  timerecord.timer# 重启定时任务状态
systemctl list-timers --all # 查看定时任务列表
systemctl  daemon-reload  # 更改了配置文件后,需要重新加载
journalctl -u mytimer.timer # 查看 mytimer.timer 的日志
journalctl -u mytimer # 查看 mytimer.timer 和 mytimer.service 的日志
journalctl -f # 从结尾开始查看最新日志
journalctl -f -u timer.timer # 从结尾开始查看 mytimer.timer 的日志Linux公社的RSS地址:https://www.linuxidc.com/rssFeed.as
转载自演道,想查看更及时的互联网产品技术热点文章请点击http://go2live.cn
About The Author
maynard
懒散,不想无聊