Dockerfile与Dockerfile实战-演道网
前言
先前我们在讲述docker的镜像构建时对Dockerfile做了初步介绍,本文将结合上次的内容做更加细致的介绍,从回顾到实战演练讲述Dockerfile,本文先通过三个简单的案例感受、理解Dockerfile,主要是写httpd、sshd、以及systemctl的Dockerfile,之后会进行对其他服务如Nginx、Tomcat以及MySQL编写并且测试Dockerfile。
- 揭开Docker的面纱 – 基础理论梳理和安装流程演示 https://www.linuxidc.com/Linux/2020-04/163003.htm
- Docker基础命令详解 – 镜像及容器操作 https://www.linuxidc.com/Linux/2020-04/163005.htm
- 深入理解Docker的硬件资源控制与验证 https://www.linuxidc.com/Linux/2020-04/163006.htm
- Docker网络模式与配置Docker自定义网络(bridge模式) https://www.linuxidc.com/Linux/2020-04/163007.htm
- Docker构建镜像的三种方式(Dockerfile初步) https://www.linuxidc.com/Linux/2020-04/163008.htm
- 教你如何搭建Docker私有仓库 https://www.linuxidc.com/Linux/2020-04/163009.htm
- 深入理解Docker数据管理与端口映射 https://www.linuxidc.com/Linux/2020-04/163010.htm
回顾Dockerfile
说到Dockerfile,就离不开Dockerfile的核心组件,尤其是镜像。镜像是运行容器的基础环境,也就是说镜像是docker容器创建的关键,而创建镜像的三种方式之一的Dockerfile是最为灵活的。
什么是Dockerfile?
Dockerfile可以看做是被Docker程序所解释翻译的脚本,由一组命令集合而成,每一条命令都对应一条操作命令,有其翻译为Linux下的具体命令。用户可以通过自定义内容来快速构建镜像。
其实说简单点,你可以认为Dockerfile是“专门用于构建镜像的shell脚本”。
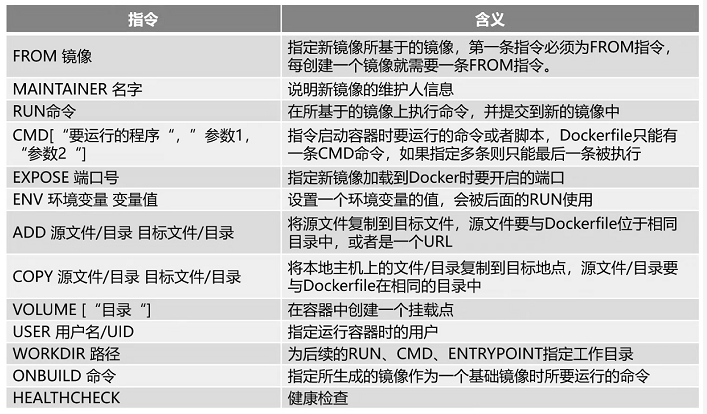
还记得Dockerfile的严格格式吗?我们先来看一下这个表格。
Dockerfile是一种分层结构,其中的指令每一条都会构建一层镜像及容器,只不过这是临时的,除了基础镜像,其他中间产生的容器最后都会被清除。当然有时候会出现一些“无名氏”镜像,标志就是使用docker images命令时ID和tag都是none。
出现none镜像的原因有两类:一则是好的none镜像;二则是坏的none镜像。好的none镜像:代表的是中间镜像,你可以认为是父镜像的子镜像,可以使用docker images -a查看。这类镜像不会占用磁盘空间,但是占用了屏幕显示空间。坏的none镜像:这类可能会导致磁盘空间问题。一般这种情况是旧镜像更新产生。
因此,一般情况我们都可以通过命令将none镜像删除(实战中会给出)。
Dockerfile的作用是什么?
Dockerfile的核心作用就是用户可以灵活、快速、支持自定义构建所需镜像。
简述docker执行Dockerfile流程以及构建使用镜像过程
docker执行Dockerfile流程
(1)docker从基础镜像运行一个容器;
(2)执行一条指令并对容器作出修改;
(3)执行类似docker commit的操作提交一个新的镜像层;
(4)docker再基于刚提交的镜像运行一个新容器;
(5)执行dockerfile中的下一条指令直到所有指令都执行完成。
构建使用镜像过程
构建镜像命令举例:docker build -t image_name . (不要忽视这个点)
使用镜像命令举例:docker run -d -P image_name
最后使用docker ps -a 查看容器运行状态,如果是up状态就可以镜像测试验证了。
Dockerfile实战
1、构建httpd服务镜像
首先创建工作目录
mkdir apache
cd apache
编写Dockerfile
vim Dockerfile
#基于的基础镜像
FROM CentOS
#维护镜像的用户信息
MAINTAINER [email protected]
#镜像操作指令安装Apache软件
RUN yum -y update
RUN yum -y install httpd
#开启 80端口
EXPOSE 80
#复制网站首页文件
ADD index.html /var/www/html/index.html
#将执行脚本复制到镜像中
ADD run.sh /run.sh
RUN chmod 755 /run.sh
#启动容器是执行脚本
CMD ["/run.sh"]
其中注意:run 命令可以有多条CMD只能有一条,若有多条则只会执行最后一条
编写启动httpd服务的shell脚本
vim run.sh
#!/bin/bash
rm -rf /run/httpd/*
exec /usr/sbin/apachectl -D FOREGROUND
编写测试页面
vim index.html
<h1>this is docker httpd web</h1>
使用tree命令查看目录的文件结构
[root@localhost apache]# tree ./
./
├── Dockerfile
├── index.html
└── run.sh

0 directories, 3 files
构建和使用镜像(创建运行容器)
[root@localhost apache]# docker build -t httpd:new .
#因为我之前已经构建过,所以很快,此处案例显示过程是为了体现Dockerfile执行时的特征:分层和中间容器及镜像
Sending build context to Docker daemon  4.096kB
Step 1/9 : FROM centos:7
 ---> 5e35e350aded
Step 2/9 : MAINTAINER [email protected]
 ---> Using cache
 ---> 3a68b2812314
Step 3/9 : RUN yum -y update
 ---> Using cache
 ---> ecf1ecb0a774
Step 4/9 : RUN yum install -y httpd
 ---> Using cache
 ---> ae8c1ee32fbd
Step 5/9 : EXPOSE 80
 ---> Using cache
 ---> 29f12f1f7490
Step 6/9 : ADD index.html /var/www/html/index.html
 ---> Using cache
 ---> f56113e6b984
Step 7/9 : ADD run.sh /run.sh
 ---> Using cache
 ---> 886bf9e654ab
Step 8/9 : RUN chmod +x /run.sh
 ---> Using cache
 ---> bf53e19ad44f
Step 9/9 : CMD ["/run.sh"]
 ---> Using cache
 ---> 9500f0aefd1d
Successfully built 9500f0aefd1d
Successfully tagged httpd:new

[root@localhost apache]# docker images
REPOSITORY            TAG                 IMAGE ID            CREATED             SIZE
httpd                 new                 9500f0aefd1d        35 seconds ago      524MB
centos                7                   5e35e350aded        5 months ago        203MB
...//之后的案例将不再查看镜像了哈!
#基于构建的镜像创建并运行容器,给容器取名为test
[root@localhost apache]# docker run --name test -d -P httpd:new
b7ec122849c61e36adb4a8891a87126afb53b1d5edfa2fda2a1ea18afa1a3169
[root@localhost apache]# docker ps -a
CONTAINER ID        IMAGE                 COMMAND                  CREATED             STATUS                      PORTS                   NAMES
b7ec122849c6        httpd:new             "/run.sh"                3 seconds ago       Up 3 seconds                0.0.0.0:32768->80/tcp   test
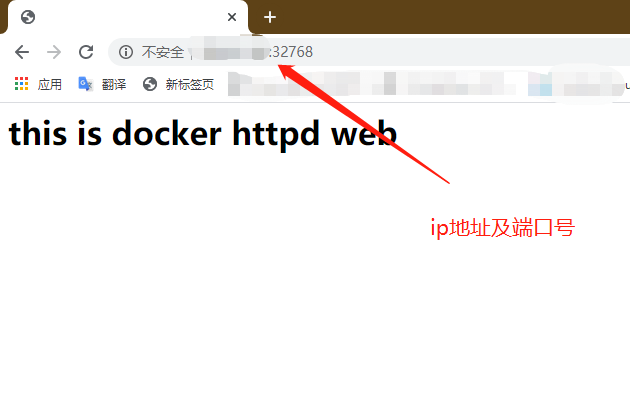
这样我们进入容器中检查一下这个页面文件是否存在
[root@localhost apache]# docker exec -it test /bin/bash
[root@b7ec122849c6 /]# cat /var/www/html/index.html
this is docker httpd web
那么此时我们可以通过浏览器访问宿主机ip地址结合端口号(32768)来访问网站,结果如下:
下面的案例构建就直接给出Dockerfile和构建测试命令了。主要介绍其中的关键点。
2、构建sshd镜像
mkdir sshd

cd sshd
#sshd服务的镜像构建——基于Dockerfile
#首先先下载基础镜像centos,创建对应的工作目录
#开始编写nginx的Dockerfile
#第一步:基础镜像
FROM centos:7
#第二步:维护者信息
MAINTAINER [email protected]
#第三步:指令集
RUN yum -y update
RUN yum -y install openssh* net-tools lsof telnet passwd
RUN echo '123123' | passwd --stdin root
#不以PAM认证登录而是以密钥对登录(非对称密钥),即禁用ssh的PAM认证
RUN sed -i 's/UsePAM yes/UsePAM no/g' /etc/ssh/sshd_config
RUN ssh-keygen -t rsa -f /etc/ssh/ssh_host_rsa_key
#禁用ssh中PAM会话模块
RUN sed -i '/^sessions+requireds+pam_loginuid.so/s/^/#/' /etc/pam.d/sshd
#创建ssh工作目录和权限设置
RUN mkdir -p /root/.ssh && chown root:root /root && chmod 700 /root/.ssh
#开放22端口
EXPOSE 22
#第四步:启动容器时执行指令
CMD ["/usr/sbin/sshd","-D"]
构建镜像和运行容器
[root@localhost sshd]# docker build -t sshd:new .
[root@localhost sshd]# docker run -d -P sshd:new
c7991648efebd192eb29f1d4e3503e47e0581f55381ff7a23e545041ef5d3e67
[root@localhost sshd]# docker ps -a
CONTAINER ID        IMAGE               COMMAND               CREATED             STATUS              PORTS                   NAMES
c7991648efeb        sshd:new            "/usr/sbin/sshd -D"   20 seconds ago      Up 20 seconds       0.0.0.0:32769->22/tcp   jolly_ishizaka
b7ec122849c6        httpd:new           "/run.sh"             20 minutes ago      Up 20 minutes       0.0.0.0:32768->80/tcp   test
测试
[root@localhost sshd]# ssh 20.0.0.149 -p 32769
The authenticity of host '[20.0.0.149]:32769 ([20.0.0.149]:32769)' can't be established.
RSA key fingerprint is SHA256:XLezVGFvOKIKW3fTBD0sIE9rsdz4021taphmcCo8IJM.
RSA key fingerprint is MD5:1e:86:94:2a:f5:a3:6c:e2:b4:b1:e4:50:9c:ad:8e:fb.
Are you sure you want to continue connecting (yes/no)? yes
Warning: Permanently added '[20.0.0.149]:32769' (RSA) to the list of known hosts.
[email protected]'s password:
[root@c7991648efeb ~]# exit
logout
Connection to 20.0.0.149 closed.
此时我们登录该容器(ssh或者docker exec命令)查看sshd服务的状态(但是systemctl无法使用)
[root@c7991648efeb ~]# systemctl status sshd
Failed to get D-Bus connection: Operation not permitted
一则我们可以使用下面的命令使用该命令,二则我们可以基于上面构建的镜像作为基础镜像构建systemctl的镜像来测试验证。
[root@localhost sshd]# docker run --privileged -itd -P sshd:new  /usr/sbin/init
8dafa05dc12fc02f91dce93c6ab3085ab55eff1ee6b18c24731205e5c2ed37a9
[root@localhost sshd]# docker ps -a
CONTAINER ID        IMAGE               COMMAND               CREATED             STATUS              PORTS                   NAMES
8dafa05dc12f        sshd:new            "/usr/sbin/init"      3 seconds ago       Up 3 seconds        0.0.0.0:32770->22/tcp   hardcore_mccarthy
c7991648efeb        sshd:new            "/usr/sbin/sshd -D"   20 minutes ago      Up 20 minutes       0.0.0.0:32769->22/tcp   jolly_ishizaka
b7ec122849c6        httpd:new           "/run.sh"             40 minutes ago      Up 40 minutes       0.0.0.0:32768->80/tcp   test
[root@localhost sshd]# ssh 20.0.0.149 -p 32770
The authenticity of host '[20.0.0.149]:32770 ([20.0.0.149]:32770)' can't be established.
ECDSA key fingerprint is SHA256:LU81jNjOCKaiWrCsxTLPmx+YsUMVOBa2rG/XLXQsv9E.
ECDSA key fingerprint is MD5:03:15:aa:8a:65:8a:cc:b4:fb:66:f8:f6:6c:89:84:7b.
Are you sure you want to continue connecting (yes/no)? yes
Warning: Permanently added '[20.0.0.149]:32770' (ECDSA) to the list of known hosts.
[email protected]'s password:
[root@8dafa05dc12f ~]# systemctl status sshd
● sshd.service - OpenSSH server daemon
   Loaded: loaded (/usr/lib/systemd/system/sshd.service; enabled; vendor preset: enabled)
   Active: active (running) since Wed 2020-04-22 02:28:49 UTC; 33s ago
     Docs: man:sshd(8)
           man:sshd_config(5)
–privileged表示提权,使得容器真正具备root的权限
3、构建systemctl镜像
mkdir systemctl
cd systemctl
创建Dockerfile
vim Dockerfile
FROM sshd:new
MAINTAINER [email protected]
ENV container docker
#下面的命令是放在一个镜像层中执行的,可以减少镜像层
#括号中的指令含义是遍历进入的目录文件,删除除了systemd-tmpfiles-setup.service的所有文件,之后删除一些其他文件
RUN (cd /lib/systemd/system/sysinit.target.wants/; for i in *; do [ $i == systemd-tmpfiles-setup.service ] || rm -f $i; done);
rm -f /lib/systemd/system/multi-user.target.wants/*;
rm -f /etc/systemd/system/*.wants/*;
rm -f /lib/systemd/system/local-fs.target.wants/*;
rm -f /lib/systemd/system/sockets.target.wants/*udev*;
rm -f /lib/systemd/system/sockets.target.wants/*initctl*;
rm -f /lib/systemd/system/basic.target.wants/*;
rm -f /lib/systemd/system/anaconda.target.wants/*;
VOLUME [ "/sys/fs/cgroup" ]
CMD ["/usr/sbin/init"]
构建运行及测试
[root@localhost systemctl]# docker build -t systemctl:new .
[root@localhost systemctl]# docker run --privileged -it -v /sys/fs/cgroup/:/sys/fs/cgroup:ro systemctl:new /usr/sbin/init
systemd 219 running in system mode. (+PAM +AUDIT +SELINUX +IMA -APPARMOR +SMACK +SYSVINIT +UTMP +LIBCRYPTSETUP +GCRYPT +GNUTLS +ACL +XZ +LZ4 -SECCOMP +BLKID +ELFUTILS +KMOD +IDN)
Detected virtualization docker.
Detected architecture x86-64.

Welcome to CentOS Linux 7 (Core)!

Set hostname to .
[  OK  ] Reached target Paths.
[  OK  ] Reached target Local File Systems.
[  OK  ] Reached target Swap.
[  OK  ] Created slice Root Slice.
[  OK  ] Listening on Journal Socket.
[  OK  ] Created slice System Slice.
         Starting Create Volatile Files and Directories...
[  OK  ] Listening on Delayed Shutdown Socket.
[  OK  ] Reached target Slices.
         Starting Journal Service...
[  OK  ] Started Create Volatile Files and Directories.
[ INFO ] Update UTMP about System Boot/Shutdown is not active.
[DEPEND] Dependency failed for Update UTMP about System Runlevel Changes.
Job systemd-update-utmp-runlevel.service/start failed with result 'dependency'.
[  OK  ] Started Journal Service.
[  OK  ] Reached target System Initialization.
[  OK  ] Started Daily Cleanup of Temporary Directories.
[  OK  ] Reached target Timers.
[  OK  ] Listening on D-Bus System Message Bus Socket.
[  OK  ] Reached target Sockets.
[  OK  ] Reached target Basic System.
[  OK  ] Reached target Multi-User System.
重新开启一个终端进行测试
[root@localhost systemctl]# docker ps -a
CONTAINER ID        IMAGE               COMMAND               CREATED              STATUS              PORTS                   NAMES
e99fd581042a        systemctl:new       "/usr/sbin/init"      About a minute ago   Up About a minute   22/tcp                  gifted_edison
8dafa05dc12f        sshd:new            "/usr/sbin/init"      6 minutes ago        Up 6 minutes        0.0.0.0:32770->22/tcp   hardcore_mccarthy
c7991648efeb        sshd:new            "/usr/sbin/sshd -D"   27 minutes ago       Up 27 minutes       0.0.0.0:32769->22/tcp   jolly_ishizaka
b7ec122849c6        httpd:new           "/run.sh"             46 minutes ago       Up 46 minutes       0.0.0.0:32768->80/tcp   test
[root@localhost systemctl]# docker exec -it gifted_edison /bin/bash
[root@e99fd581042a /]# systemctl status sshd
● sshd.service - OpenSSH server daemon
   Loaded: loaded (/usr/lib/systemd/system/sshd.service; disabled; vendor preset: enabled)
   Active: inactive (dead)
     Docs: man:sshd(8)
           man:sshd_config(5)
[root@e99fd581042a /]# systemctl start sshd
[root@e99fd581042a /]# systemctl status sshd
● sshd.service - OpenSSH server daemon
   Loaded: loaded (/usr/lib/systemd/system/sshd.service; disabled; vendor preset: enabled)
   Active: active (running) since Wed 2020-04-22 02:36:18 UTC; 1s ago
     Docs: man:sshd(8)
           man:sshd_config(5)
 Main PID: 51 (sshd)
   CGroup: /docker/e99fd581042af009c4a15e9ab7bdd231c0052056051a1b18e9996f57eb7f2c6b/system.slice/sshd.service
           └─51 /usr/sbin/sshd -D

Apr 22 02:36:18 e99fd581042a systemd[1]: Starting OpenSSH server daemon...
Apr 22 02:36:18 e99fd581042a sshd[51]: WARNING: 'UsePAM no' is not supported in Red Hat Enterprise Linux and may cause several problems.
Apr 22 02:36:18 e99fd581042a sshd[51]: Server listening on 0.0.0.0 port 22.
Apr 22 02:36:18 e99fd581042a sshd[51]: Server listening on :: port 22.
Apr 22 02:36:18 e99fd581042a systemd[1]: Started OpenSSH server daemon.
#开启sshd服务后进行访问宿主机测试成功
[root@e99fd581042a /]# ssh 20.0.0.149 -p 22
The authenticity of host '20.0.0.149 (20.0.0.149)' can't be established.
ECDSA key fingerprint is SHA256:pT/8N0H/tNaMm4Zqh7u28Jm5EtmDkidSaih4lWzFIQY.
ECDSA key fingerprint is MD5:16:47:40:1f:40:1b:34:e9:ff:f9:15:7b:0b:f4:02:8b.
Are you sure you want to continue connecting (yes/no)? yes
Warning: Permanently added '20.0.0.149' (ECDSA) to the list of known hosts.
[email protected]'s password:
Last login: Wed Apr 22 10:35:20 2020 from 20.0.0.149
[root@localhost ~]# exit
登出
Connection to 20.0.0.149 closed.
[root@e99fd581042a /]# exit
exit
总结
本文回顾了Dockerfile,结合三个案例(httpd服务、sshd服务、systemd服务)来深入理解Dockerfile构建镜像的过程。其中我们需要理解的是
1、每个服务都需要有自己的目录和文件
2、Dockerfile的分层和中间缓存镜像和容器的创建和删除特点
3、–privileged的作用
4、体会整个从构建镜像、创建运行容器到测试验证的过程
谢谢阅读!
Linux公社的RSS地址:https://www.linuxidc.com/rssFeed.aspx
本文永久更新链接地址:<a href="../../Linux
转载自演道,想查看更及时的互联网产品技术热点文章请点击http://go2live.cn