CentOS 7中网络设置图文详解-演道网
查看CentOS 7网络接口信息
- 查看所有活动网络接口的信息
- ifconfig命令
[root@localhost ~]# ifconfig    //查看网络接口信息
ens33: flags=4163  mtu 1500
        inet 192.168.144.133  netmask 255.255.255.0  broadcast 192.168.144.255
        inet6 fe80::a85a:c203:e2e:3f3c  prefixlen 64  scopeid 0x20
        ether 00:0c:29:5b:d3:a0  txqueuelen 1000  (Ethernet)
        RX packets 6139  bytes 3599390 (3.4 MiB)
        RX errors 0  dropped 0  overruns 0  frame 0
        TX packets 2483  bytes 330519 (322.7 KiB)
        TX errors 0  dropped 0 overruns 0  carrier 0  collisions 0

lo: flags=73  mtu 65536
        inet 127.0.0.1  netmask 255.0.0.0
        inet6 ::1  prefixlen 128  scopeid 0x10
        loop  txqueuelen 1  (Local Loopback)
        RX packets 84  bytes 7500 (7.3 KiB)
        RX errors 0  dropped 0  overruns 0  frame 0
        TX packets 84  bytes 7500 (7.3 KiB)
        TX errors 0  dropped 0 overruns 0  carrier 0  collisions 0

virbr0: flags=4099  mtu 1500
        inet 192.168.122.1  netmask 255.255.255.0  broadcast 192.168.122.255
        ether 52:54:00:d9:de:d2  txqueuelen 1000  (Ethernet)
        RX packets 0  bytes 0 (0.0 B)
        RX errors 0  dropped 0  overruns 0  frame 0
        TX packets 0  bytes 0 (0.0 B)
        TX errors 0  dropped 0 overruns 0  carrier 0  collisions 0
- 查看指定网络接口信息
- ifconfig 网络接口
[root@localhost ~]# ifconfig ens33        //查看ens33网络接口信息
ens33: flags=4163  mtu 1500
        inet 192.168.144.133  netmask 255.255.255.0  broadcast 192.168.144.255
        inet6 fe80::a85a:c203:e2e:3f3c  prefixlen 64  scopeid 0x20
        ether 00:0c:29:5b:d3:a0  txqueuelen 1000  (Ethernet)
        RX packets 6183  bytes 3602858 (3.4 MiB)
        RX errors 0  dropped 0  overruns 0  frame 0
        TX packets 2505  bytes 334073 (326.2 KiB)
        TX errors 0  dropped 0 overruns 0  carrier 0  collisions 0
查看主机名称
- 查看或设置当前主机名
- hostname命令
[root@localhost ~]# hostname //查看主机名称
localhost.localdomain
- 更改主机名称
- hostnamectl set-hostname [主机名称]
[root@localhost ~]# hostnamectl set-hostname http01    //更改主机名
[root@localhost ~]# su                 //切换用户,刷新主机名
[root@http01 ~]# hostname           //查看主机名称
http01
查看路由表条目
- 查看路由表
- route命令
[root@http01 ~]# route    //查看路由表
Kernel IP routing table
Destination     Gateway         Genmask         Flags Metric Ref    Use Iface
default         gateway         0.0.0.0         UG    100    0        0 ens33
192.168.122.0   0.0.0.0         255.255.255.0   U     0      0        0 virbr0
192.168.144.0   0.0.0.0         255.255.255.0   U     100    0        0 ens33
查看网络连接情况
-
查看系统的网络连接状态、路由表、接口统计等信息
- netstat命令
netstat [选项]
- 常用选项
-a :全部
-n:数字格式显示
-p:协议
-t :tcp
-u :udp
-r:路由
[root@http01 ~]# netstat -antp      //查看以数字格式显示全部TCP协议端口的网络连接情况
Active Internet connections (servers and established)
Proto Recv-Q Send-Q Local Address           Foreign Address         State       PID/Program name
tcp        0      0 0.0.0.0:111             0.0.0.0:*               LISTEN      1/systemd
tcp        0      0 192.168.122.1:53        0.0.0.0:*               LISTEN      1308/dnsmasq
tcp        0      0 0.0.0.0:22              0.0.0.0:*               LISTEN      983/sshd
tcp        0      0 127.0.0.1:631           0.0.0.0:*               LISTEN      985/cupsd
tcp        0      0 127.0.0.1:25            0.0.0.0:*               LISTEN      1292/master
tcp        0      0 127.0.0.1:6010          0.0.0.0:*               LISTEN      4840/sshd: root@pts
tcp        0      0 192.168.144.133:22      192.168.144.1:54734     ESTABLISHED 4840/sshd: root@pts
tcp6       0      0 :::111                  :::*                    LISTEN      1/systemd
tcp6       0      0 :::80                   :::*                    LISTEN      2373/httpd
tcp6       0      0 :::22                   :::*                    LISTEN      983/sshd
tcp6       0      0 ::1:631                 :::*                    LISTEN      985/cupsd
tcp6       0      0 ::1:25                  :::*                    LISTEN      1292/master
tcp6       0      0 ::1:6010                :::*                    LISTEN      4840/sshd: root@pts
[root@http01 ~]# netstat -nuap         //查看以数字格式显示全部UDP协议端口的网络连接情况
Active Internet connections (servers and established)
Proto Recv-Q Send-Q Local Address           Foreign Address         State       PID/Program name
udp        0      0 0.0.0.0:36571           0.0.0.0:*                           788/dhclient
udp        0      0 0.0.0.0:47956           0.0.0.0:*                           578/avahi-daemon: r
udp        0      0 192.168.122.1:53        0.0.0.0:*                           1308/dnsmasq
udp        0      0 0.0.0.0:67              0.0.0.0:*                           1308/dnsmasq
udp        0      0 0.0.0.0:68              0.0.0.0:*                           788/dhclient
udp        0      0 0.0.0.0:5353            0.0.0.0:*                           578/avahi-daemon: r
udp        0      0 127.0.0.1:323           0.0.0.0:*                           636/chronyd
udp6       0      0 :::57996                :::*                                788/dhclient
udp6       0      0 ::1:323                 :::*                                636/chronyd
[root@http01 ~]# netstat -r     //查看路由信息,与route命令作用相同
Kernel IP routing table
Destination     Gateway         Genmask         Flags   MSS Window  irtt Iface
default         gateway         0.0.0.0         UG        0 0          0 ens33
192.168.122.0   0.0.0.0         255.255.255.0   U         0 0          0 virbr0
192.168.144.0   0.0.0.0         255.255.255.0   U         0 0          0 ens33
网络测试连接
-
测试网络通讯性
- ping命令
ping [主机名]/[IP地址]
[root@http01 ~]# ping 192.168.100.10        //测试网络通讯
PING 192.168.100.10 (192.168.100.10) 56(84) bytes of data.
64 bytes from 192.168.100.10: icmp_seq=1 ttl=128 time=0.860 ms
64 bytes from 192.168.100.10: icmp_seq=2 ttl=128 time=0.530 ms
64 bytes from 192.168.100.10: icmp_seq=3 ttl=128 time=0.514 ms
64 bytes from 192.168.100.10: icmp_seq=4 ttl=128 time=0.465 ms
跟踪数据包
-
测试从当前主机到目的主机之间经过的网络节点
- traceroute命令
traceroute 目标主机地址
[root@http01 ~]# traceroute 192.168.100.10
traceroute to 192.168.100.10 (192.168.100.10), 30 hops max, 60 byte packets
 1  gateway (192.168.144.2)  0.320 ms  0.255 ms  0.223 ms
 2  * * *
 3  * * *
 4  * * *
域名解析
-
测试DNS域名解析
- nslookup命令
nslookup [目标主机地址]/[目标DNS地址]
[root@http01 ~]# nslookup www.baidu.com
Server:     192.168.144.2
Address:    192.168.144.2#53

Non-authoritative answer:
www.baidu.com   canonical name = www.a.shifen.com.
Name:   www.a.shifen.com
Address: 183.232.231.172
Name:   www.a.shifen.com
Address: 183.232.231.174
设置网络参数的方式
临时配置——使用命令调整网络参数
- 简单、快速,可直接修改运行中的网络参数
- 一般只适合在调试网络的过程中使用
- 重新启动以后,所做的修改将会失效
固定设置——通过配置文件修改网络参数
- 修改各项网络参数的配置文件
- 适合对服务器设置固定参数时使用
- 需要重载网络服务或者重启以后才会生效
设置网络接口的参数
-
临时设置网络接口的IP地址、子网掩码
ifconfig 接口名 IP地址 [netmask(子网掩码)]
[root@http01 ~]# ifconfig ens33               //查看ens33接口IP地址
ens33: flags=4163  mtu 1500
        inet 192.168.144.133  netmask 255.255.255.0  broadcast 192.168.144.255
        inet6 fe80::a85a:c203:e2e:3f3c  prefixlen 64  scopeid 0x20
        ether 00:0c:29:5b:d3:a0  txqueuelen 1000  (Ethernet)
        RX packets 42  bytes 3966 (3.8 KiB)
        RX errors 0  dropped 0  overruns 0  frame 0
        TX packets 86  bytes 9346 (9.1 KiB)
        TX errors 0  dropped 0 overruns 0  carrier 0  collisions 0

[root@http01 ~]# ifconfig ens33 192.168.144.138/24    //设置临时IP地址
[root@http01 ~]# ifconfig ens33                     //查看是否成功设置
ens33: flags=4163  mtu 1500
        inet 192.168.144.138  netmask 255.255.255.0  broadcast 192.168.144.255
        inet6 fe80::a85a:c203:e2e:3f3c  prefixlen 64  scopeid 0x20
        ether 00:0c:29:5b:d3:a0  txqueuelen 1000  (Ethernet)
        RX packets 2660  bytes 3613441 (3.4 MiB)
        RX errors 0  dropped 0  overruns 0  frame 0
        TX packets 844  bytes 57384 (56.0 KiB)
        TX errors 0  dropped 0 overruns 0  carrier 0  collisions 0
[root@http01 ~]# systemctl restart network           //重启网络服务
[root@http01 ~]# ifconfig ens33                 //查看IP地址
ens33: flags=4163  mtu 1500
        inet 192.168.144.133  netmask 255.255.255.0  broadcast 192.168.144.255
        inet6 fe80::a85a:c203:e2e:3f3c  prefixlen 64  scopeid 0x20
        ether 00:0c:29:5b:d3:a0  txqueuelen 1000  (Ethernet)      //设置的IP地址失效
        RX packets 2708  bytes 3618185 (3.4 MiB)
        RX errors 0  dropped 0  overruns 0  frame 0
        TX packets 894  bytes 63590 (62.0 KiB)
        TX errors 0  dropped 0 overruns 0  carrier 0  collisions 0
-
设置固定网络接口的IP地址、子网掩码
设置固定的网络接口IP地址、子网掩码,需要在网络接口的配置文件中更改配置文件来完成。
-
网络接口配置文件
/etc/sysconfig/network-scripts/
-
重启network网络服务
systemctl restart network
[root@http01 ~]# vim /etc/sysconfig/network-scripts/ifcfg-ens33  //进入编辑网卡配置文件

TYPE=Ethernet
PROXY_METHOD=none
BROWSER_ONLY=no
BOOTPROTO=staticl          //将DHCP更改为staticl
DEFROUTE=yes
IPV4_FAILURE_FATAL=no
IPV6INIT=yes
IPV6_AUTOCONF=yes
IPV6_DEFROUTE=yes
IPV6_FAILURE_FATAL=no
IPV6_ADDR_GEN_MODE=stable-privacy
NAME=ens33
UUID=2ef6b862-5201-48c5-a450-23b3720ab3a0
DEVICE=ens33
ONBOOT=yes
IPADDR=192.168.144.138          //输入要设定的IP地址
NETMAS=255.255.255.0         //输入子网掩码
GATEWAY=192.168.144.1        //输入网关地址
[root@http01 ~]# systemctl restart network    //重启网络服务
[root@http01 ~]# ifconfig ens33
ens33: flags=4163  mtu 1500
        inet 192.168.144.138  netmask 255.255.255.0  broadcast 192.168.144.255
        inet6 fe80::20c:29ff:fe5b:d3a0  prefixlen 64  scopeid 0x20
        ether 00:0c:29:5b:d3:a0  txqueuelen 1000  (Ethernet)   //地址设置成功
        RX packets 3832  bytes 3715216 (3.5 MiB)
        RX errors 0  dropped 0  overruns 0  frame 0
        TX packets 1558  bytes 160876 (157.1 KiB)
        TX errors 0  dropped 0 overruns 0  carrier 0  collisions 0
-
禁用或者重新激活网卡
- 禁用网卡
ifconfig 网络接口 down
- 重新激活网卡
ifconfig 网络接口 up
[root@localhost ~]# ifconfig ens33 down              //禁用网卡
[root@localhost ~]# ifconfig ens33              //查看网卡信息,无IP地址连接
ens33: flags=4098  mtu 1500
        ether 00:0c:29:5b:d3:a0  txqueuelen 1000  (Ethernet)
        RX packets 459  bytes 495831 (484.2 KiB)
        RX errors 0  dropped 0  overruns 0  frame 0
        TX packets 240  bytes 22865 (22.3 KiB)
        TX errors 0  dropped 0 overruns 0  carrier 0  collisions 0
[root@localhost ~]# ifconfig ens33 up            //重新激活网卡
[root@localhost ~]# ifconfig ens33            //查看网卡信息,成功获取IP地址
ens33: flags=4163  mtu 1500
        inet 192.168.144.133  netmask 255.255.255.0  broadcast 192.168.144.255
        inet6 fe80::a85a:c203:e2e:3f3c  prefixlen 64  scopeid 0x20
        ether 00:0c:29:5b:d3:a0  txqueuelen 1000  (Ethernet)
        RX packets 463  bytes 496409 (484.7 KiB)
        RX errors 0  dropped 0  overruns 0  frame 0
        TX packets 264  bytes 26630 (26.0 KiB)
        TX errors 0  dropped 0 overruns 0  carrier 0  collisions 0
-
虚拟网络接口
- 虚拟网络接口是指共用一个网卡,同一网卡可以配多个IP地址,不管访问哪一个IP地址都能访问同一服务器。(当不想用虚拟网卡时直接禁用虚拟网卡即可)
ifconfig 接口名:序号 IP地址
[root@localhost ~]# ifconfig ens33:0 192.168.144.140 //在ens33网卡上添加虚拟网卡,序列号为0
[root@localhost ~]# ifconfig                 //查看网卡信息
ens33: flags=4163  mtu 1500
        inet 192.168.144.133  netmask 255.255.255.0  broadcast 192.168.144.255
        inet6 fe80::a85a:c203:e2e:3f3c  prefixlen 64  scopeid 0x20
        ether 00:0c:29:5b:d3:a0  txqueuelen 1000  (Ethernet)
        RX packets 653  bytes 512686 (500.6 KiB)
        RX errors 0  dropped 0  overruns 0  frame 0
        TX packets 373  bytes 39897 (38.9 KiB)
        TX errors 0  dropped 0 overruns 0  carrier 0  collisions 0

ens33:0: flags=4163  mtu 1500  //创建的虚拟网卡
        inet 192.168.144.140  netmask 255.255.255.0  broadcast 192.168.144.255
        ether 00:0c:29:5b:d3:a0  txqueuelen 1000  (Ethernet)

lo: flags=73  mtu 65536
        inet 127.0.0.1  netmask 255.0.0.0
        inet6 ::1  prefixlen 128  scopeid 0x10
        loop  txqueuelen 1  (Local Loopback)
        ...//省略部分内容...
设置路由记录
-
添加到指定网段的路由记录
- route add -net 网段地址 gw IP地址(网关)
-
删除到指定网段的路由记录
- route del -net 网段地址
-
删除路由表中默认网关记录
- route del default gw IP地址
- 向路由表中添加默认网关记录
- route add default gw IP地址
[root@localhost ~]# route         //查看路由表
Kernel IP routing table
Destination     Gateway         Genmask         Flags Metric Ref    Use Iface
default         gateway         0.0.0.0         UG    100    0        0 ens33
192.168.122.0   0.0.0.0         255.255.255.0   U     0      0        0 virbr0
192.168.144.0   0.0.0.0         255.255.255.0   U     100    0        0 ens33
[root@localhost ~]# route add -net 192.168.100.0/24 gw 192.168.144.1  //添加网段
[root@localhost ~]# route     //查看路由表是否添加网段
Kernel IP routing table
Destination     Gateway         Genmask         Flags Metric Ref    Use Iface
default         gateway         0.0.0.0         UG    100    0        0 ens33
192.168.100.0   192.168.144.1   255.255.255.0   UG    0      0        0 ens33
192.168.122.0   0.0.0.0         255.255.255.0   U     0      0        0 virbr0
192.168.144.0   0.0.0.0         255.255.255.0   U     100    0        0 ens33
[root@localhost ~]# route del -net 192.168.100.0/24  //删除添加的网段
[root@localhost ~]# route              //查看路由表,看添加的网段是否删除
Kernel IP routing table
Destination     Gateway         Genmask         Flags Metric Ref    Use Iface
default         gateway         0.0.0.0         UG    100    0        0 ens33
192.168.122.0   0.0.0.0         255.255.255.0   U     0      0        0 virbr0
192.168.144.0   0.0.0.0         255.255.255.0   U     100    0        0 ens33
[root@localhost ~]# route add default gw 192.168.144.1  //添加默认网关
[root@localhost ~]# route          //查看是否成功添加默认网关
Kernel IP routing table
Destination     Gateway         Genmask         Flags Metric Ref    Use Iface
default         gateway         0.0.0.0         UG    0      0        0 ens33
default         gateway         0.0.0.0         UG    100    0        0 ens33
192.168.122.0   0.0.0.0         255.255.255.0   U     0      0        0 virbr0
192.168.144.0   0.0.0.0         255.255.255.0   U     100    0        0 ens33
[root@localhost ~]# route del default gw 192.168.144.1   //删除添加的默认网关
[root@localhost ~]# route              //查看路由表是否成功删除
Kernel IP routing table
Destination     Gateway         Genmask         Flags Metric Ref    Use Iface
default         gateway         0.0.0.0         UG    100    0        0 ens33
192.168.122.0   0.0.0.0         255.255.255.0   U     0      0        0 virbr0
192.168.144.0   0.0.0.0         255.255.255.0   U     100    0        0 ens33
主机名称配置文件
-
保存全局网络设置,主要包括主机名信息
/etc/sysconfig/network//etc/hostname
在CentOS 6中若要修改主机名可以执行“vim /etc/sysconfig/network”修改配置文件,而在CentOS 7中我们可以执行“vim /etc/hostname”就可以去修改主机名配置文件了。
[root@localhost ~]# vim /etc/hostname   //进入编辑主机名配置文件

localhost.localdomain       //当前主机名   如若修改可以直接在编辑器修改主机名
~
~
~
~
~
~
域名解析配置文件
-
指定为本机体提供DNS解析的服务器地址(对改文件的修改将会立即生效)
- /etc/resolv.conf
- 格式
- nameserver IP地址
[root@localhost ~]# vim /etc/resolv.conf

# Generated by NetworkManager
search localdomain
nameserver 192.168.144.2
~
~
~
~
本地主机映射文件
在本地主机映射文件中添加映射记录,当访问添加的记录网站时,将会直接向添加的映射记录IP地址发送web请求,省略了向DNS服务器解析IP地址的过程。
-
保存主机名与IP地址的映射记录
- /etc/hosts
- hosts文件和DNS服务器的比较
- 默认情况下,系统首先从hosts文件查找解析记录
- hosts文件只对当前的主机有效
- hosts文件可减少DNS查询过程,从而加快访问速度
补充内容:
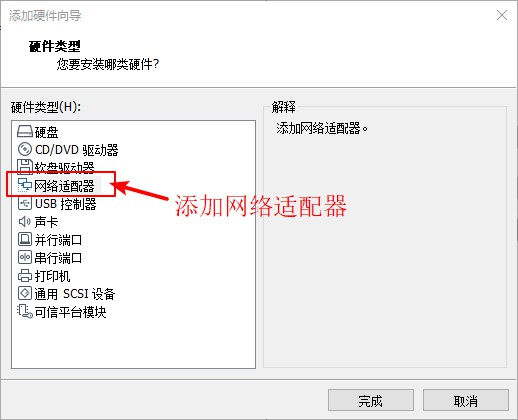
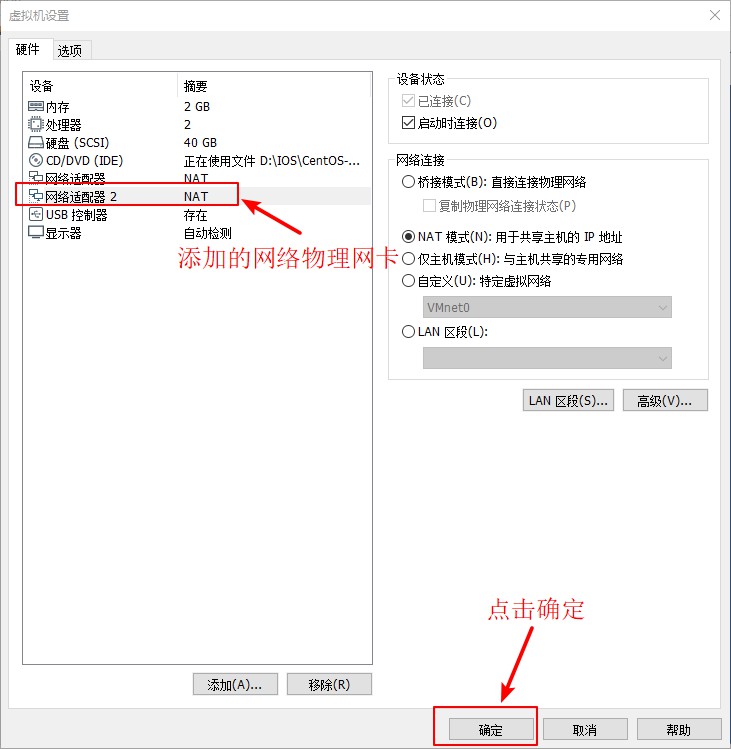
双网卡的建立
在日常生产活动中难免会遇到需要建立双网卡的情况,这里我们来看看如何建立双网卡
1、首先在虚拟机Linux操作系统中添加一块物理网卡,然后查看网络接口信息,确定是否成功添加网络
[root@localhost ~]# ifconfig      //查看网接口信息
ens33: flags=4163  mtu 1500
        inet 192.168.144.133  netmask 255.255.255.0  broadcast 192.168.144.255
        inet6 fe80::a85a:c203:e2e:3f3c  prefixlen 64  scopeid 0x20
        ether 00:0c:29:5b:d3:a0  txqueuelen 1000  (Ethernet)
        RX packets 3415  bytes 740748 (723.3 KiB)
        RX errors 0  dropped 0  overruns 0  frame 0
        TX packets 1725  bytes 201799 (197.0 KiB)
        TX errors 0  dropped 0 overruns 0  carrier 0  collisions 0

ens36: flags=4163  mtu 1500    //新添加的物理网卡
        inet 192.168.144.141  netmask 255.255.255.0  broadcast 192.168.144.255
        inet6 fe80::deb1:3cec:3e26:5ec2  prefixlen 64  scopeid 0x20
        ether 00:0c:29:5b:d3:aa  txqueuelen 1000  (Ethernet)
        RX packets 85  bytes 6069 (5.9 KiB)
        RX errors 0  dropped 0  overruns 0  frame 0
        TX packets 30  bytes 4667 (4.5 KiB)
        TX errors 0  dropped 0 overruns 0  carrier 0  collisions 0
2、这个时候我们查看网卡配置文件目录,看是否有添加的网卡配置文件
[root@localhost ~]# cd /etc/sysconfig/network-scripts/   //进入网卡配置文件目录
[root@localhost network-scripts]# ls       //查看,这个时候时没有新添加的网卡ens36的配置文件的
ifcfg-ens33  ifdown-ipv6    ifdown-TeamPort  ifup-ippp   ifup-routes       network-functions
ifcfg-lo     ifdown-isdn    ifdown-tunnel    ifup-ipv6   ifup-sit          network-functions-ipv6
ifdown       ifdown-post    ifup             ifup-isdn   ifup-Team
ifdown-bnep  ifdown-ppp     ifup-aliases     ifup-plip   ifup-TeamPort
ifdown-eth   ifdown-routes  ifup-bnep        ifup-plusb  ifup-tunnel
ifdown-ib    ifdown-sit     ifup-eth         ifup-post   ifup-wireless
ifdown-ippp  ifdown-Team    ifup-ib          ifup-ppp    init.ipv6-global
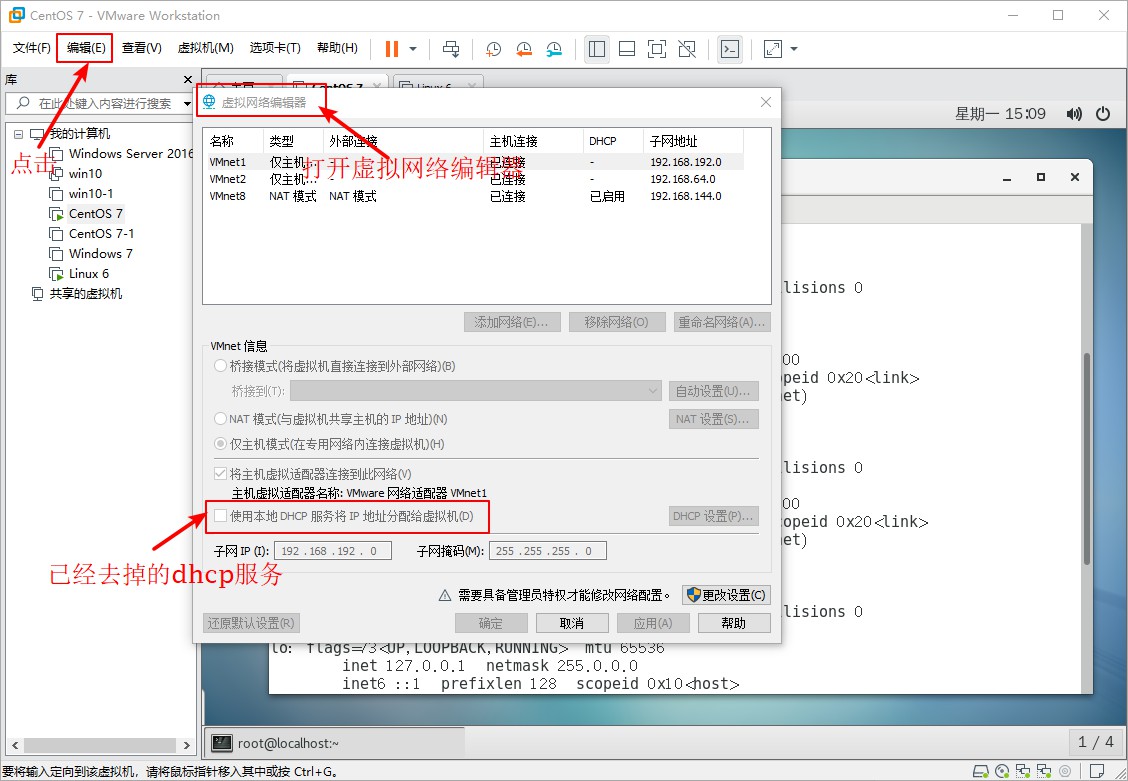
3、因为没有ens36网卡的配置文件,我们就没有办法给ens36指定固定的地址的。下面我们就把ens36与ens33这两个网卡全部设为仅主机相连模式,然后再查看网络接口信息。

[root@localhost ~]# ifconfig            //查看网络接口信息
ens33: flags=4163  mtu 1500   //无获取IP地址
        inet6 fe80::a85a:c203:e2e:3f3c  prefixlen 64  scopeid 0x20
        ether 00:0c:29:5b:d3:a0  txqueuelen 1000  (Ethernet)
        RX packets 3578  bytes 754392 (736.7 KiB)
        RX errors 0  dropped 0  overruns 0  frame 0
        TX packets 1812  bytes 215065 (210.0 KiB)
        TX errors 0  dropped 0 overruns 0  carrier 0  collisions 0

ens36: flags=4163  mtu 1500   //无发获取IP地址
        inet6 fe80::deb1:3cec:3e26:5ec2  prefixlen 64  scopeid 0x20
        ether 00:0c:29:5b:d3:aa  txqueuelen 1000  (Ethernet)
        RX packets 160  bytes 12321 (12.0 KiB)
        RX errors 0  dropped 0  overruns 0  frame 0
        TX packets 48  bytes 7865 (7.6 KiB)
        TX errors 0  dropped 0 overruns 0  carrier 0  collisions 0
我在这里无法获取IP地址是因为的VMware虚拟机中DHCP服务关掉了,所以无法获取地址。
4、这个时候我们就给这两个物理网卡配固定地址
[root@localhost ~]# vim /etc/sysconfig/network-scripts/ifcfg-ens33  //编辑网卡信息

TYPE=Ethernet
PROXY_METHOD=none
BROWSER_ONLY=no
BOOTPROTO=static               //dhcp更改为static
DEFROUTE=yes
IPV4_FAILURE_FATAL=no
IPV6INIT=yes
IPV6_AUTOCONF=yes
IPV6_DEFROUTE=yes
IPV6_FAILURE_FATAL=no
IPV6_ADDR_GEN_MODE=stable-privacy
NAME=ens33
UUID=2ef6b862-5201-48c5-a450-23b3720ab3a0
DEVICE=ens33
ONBOOT=yes
IPADDR=192.168.100.10         //输入配置IP地址
NETMAS=255.255.255.0          //输入配置子网掩码
GATEWAY=192.168.100.0         //输入配置网关
~
~
~
~
~
~
~
:wq
[root@localhost ~]# service network restart       //重启网络服务
Restarting network (via systemctl):                        [  确定  ]
[root@localhost ~]# ifconfig          //查看网络接口信息,看配置的地址是否生效
ens33: flags=4163  mtu 1500
        inet 192.168.100.10  netmask 255.255.255.0  broadcast 192.168.100.255
        inet6 fe80::a85a:c203:e2e:3f3c  prefixlen 64  scopeid 0x20
        ether 00:0c:29:5b:d3:a0  txqueuelen 1000  (Ethernet)
        RX packets 3642  bytes 771191 (753.1 KiB)
        RX errors 0  dropped 0  overruns 0  frame 0
        TX packets 1948  bytes 239617 (234.0 KiB)
        TX errors 0  dropped 0 overruns 0  carrier 0  collisions 0
下面我们进入网卡配置文件目录,这时候时没有ens36网卡的配置文件的,我们就需要把ens33的配置文件直接复制,更改为ens36的配置文件,然后把配置文件的内容更改就可以了
[root@localhost ~]# cd /etc/sysconfig/network-scripts/    //进入网卡配置文件目录
[root@localhost network-scripts]# ls     //查看
ifcfg-ens33  ifdown-isdn      ifup          ifup-plip      ifup-tunnel
ifcfg-lo     ifdown-post      ifup-aliases  ifup-plusb     ifup-wireless
ifdown       ifdown-ppp       ifup-bnep     ifup-post      init.ipv6-global
ifdown-bnep  ifdown-routes    ifup-eth      ifup-ppp       network-functions
ifdown-eth   ifdown-sit       ifup-ib       ifup-routes    network-functions-ipv6
ifdown-ib    ifdown-Team      ifup-ippp     ifup-sit
ifdown-ippp  ifdown-TeamPort  ifup-ipv6     ifup-Team
ifdown-ipv6  ifdown-tunnel    ifup-isdn     ifup-TeamPort
[root@localhost network-scripts]# cp -p ifcfg-ens33 ifcfg-ens36  //复制ens33配置文件
[root@localhost network-scripts]# ls           //查看
ifcfg-ens33  ifdown-ipv6      ifdown-tunnel  ifup-isdn    ifup-TeamPort
ifcfg-ens36  ifdown-isdn      ifup           ifup-plip    ifup-tunnel
ifcfg-lo     ifdown-post      ifup-aliases   ifup-plusb   ifup-wireless
ifdown       ifdown-ppp       ifup-bnep      ifup-post    init.ipv6-global
ifdown-bnep  ifdown-routes    ifup-eth       ifup-ppp     network-functions
ifdown-eth   ifdown-sit       ifup-ib        ifup-routes  network-functions-ipv6
ifdown-ib    ifdown-Team      ifup-ippp      ifup-sit
ifdown-ippp  ifdown-TeamPort  ifup-ipv6      ifup-Team
[root@localhost network-scripts]# vim ifcfg-ens36   //进入编辑ens36配置文件

TYPE=Ethernet
PROXY_METHOD=none
BROWSER_ONLY=no
BOOTPROTO=static
DEFROUTE=yes
IPV4_FAILURE_FATAL=no
IPV6INIT=yes
IPV6_AUTOCONF=yes
IPV6_DEFROUTE=yes
IPV6_FAILURE_FATAL=no
IPV6_ADDR_GEN_MODE=stable-privacy
NAME=ens36                            //更改33为36
DEVICE=ens36                          //更改33为36
ONBOOT=yes
IPADDR=192.168.10.10                  //更改IP地址网段
NETMAS=255.255.255.0
GATEWAY=192.168.10.0                   //更改网关地址
~
~                    注意,配置文件里面的UUID条目要删掉,让系统自动识别添加就可以了(UUID不可相同 )
~
~
~
~
~
~
:wq

[root@localhost network-scripts]# service network restart   //重新启动网络服务
Restarting network (via systemctl):                        [  确定  ]
[root@localhost network-scripts]# ifconfig      //查看网卡信息
ens33: flags=4163  mtu 1500
        inet 192.168.100.10  netmask 255.255.255.0  broadcast 192.168.100.255
        inet6 fe80::a85a:c203:e2e:3f3c  prefixlen 64  scopeid 0x20
        ether 00:0c:29:5b:d3:a0  txqueuelen 1000  (Ethernet)
        RX packets 3705  bytes 788818 (770.3 KiB)
        RX errors 0  dropped 0  overruns 0  frame 0
        TX packets 1978  bytes 243934 (238.2 KiB)
        TX errors 0  dropped 0 overruns 0  carrier 0  collisions 0

ens36: flags=4163  mtu 1500  //成功获取IP地址
        inet 192.168.10.10  netmask 255.255.255.0  broadcast 192.168.10.255
        inet6 fe80::f6eb:23e3:3afb:fef4  prefixlen 64  scopeid 0x20
        ether 00:0c:29:5b:d3:aa  txqueuelen 1000  (Ethernet)
        RX packets 248  bytes 33751 (32.9 KiB)
        RX errors 0  dropped 0  overruns 0  frame 0
        TX packets 280  bytes 49781 (48.6 KiB)
        TX errors 0  dropped 0 overruns 0  carrier 0  collisions 0
Linux公社的RSS地址:https://www.linuxidc.com/rssFeed.as
转载自演道,想查看更及时的互联网产品技术热点文章请点击http://go2live.cn