曹工说Spring Boot源码(11)– context:component-scan,你真的会用吗(这次来说说它的奇技淫巧)
写在前面的话
相关背景及资源:
曹工说Spring Boot源码(1)– Bean Definition到底是什么,附spring思维导图分享
曹工说Spring Boot源码(2)– Bean Definition到底是什么,咱们对着接口,逐个方法讲解
曹工说Spring Boot源码(3)– 手动注册Bean Definition不比游戏好玩吗,我们来试一下
曹工说Spring Boot源码(4)– 我是怎么自定义ApplicationContext,从json文件读取bean definition的?
曹工说Spring Boot源码(5)– 怎么从properties文件读取bean
曹工说Spring Boot源码(6)– Spring怎么从xml文件里解析bean的
曹工说Spring Boot源码(7)– Spring解析xml文件,到底从中得到了什么(上)
曹工说Spring Boot源码(8)– Spring解析xml文件,到底从中得到了什么(util命名空间)
曹工说Spring Boot源码(9)– Spring解析xml文件,到底从中得到了什么(context命名空间上)
曹工说Spring Boot源码(10)– Spring解析xml文件,到底从中得到了什么(context:annotation-config 解析)
工程结构图:

概要
本篇已经是spring源码第11篇,最近都在讲解:spring解析xml文件,到底获得了什么?获得了什么呢,感兴趣的可以挑选感兴趣的看;目前呢,已经讲到了context命名空间,接下来准备讲解component-scan,但是吧,这个真的是一个重量级的嘉宾,且不说原理,光是用法,就够我们感受感受啥叫主角了。
常规用法
我们在package:org.springframework.contextnamespace.componentscantest下存放了以下几个文件:
MainClassForTestComponentScan.java 测试类,包含main方法,不是bean
PersonTestController.java 使用了@Controller注解,里面使用@Autowired自动注入了PersonService
PersonService.java 使用了@Service注解
下边看下代码:
//定义一个bean
package org.springframework.contextnamespace.componentscantest;

import lombok.Data;
import lombok.extern.slf4j.Slf4j;
import org.springframework.beans.factory.annotation.Autowired;
import org.springframework.stereotype.Controller;

@Slf4j
@Data
@Controller
public class PersonTestController {

    @Autowired
    private PersonService personService;
}
// 再一个bean
package org.springframework.contextnamespace.componentscantest;

import org.springframework.stereotype.Service;

@Service
public class PersonService {
    private String personname;
}
//测试代码
package org.springframework.contextnamespace.componentscantest;

import com.alibaba.fastjson.JSONObject;
import lombok.extern.slf4j.Slf4j;
import org.springframework.beans.factory.config.BeanDefinition;
import org.springframework.context.support.ClassPathXmlApplicationContext;
import org.springframework.util.MyFastJson;

import java.util.List;
import java.util.Map;

@Slf4j
public class MainClassForTestComponentScan {

    public static void main(String[] args) {
        ClassPathXmlApplicationContext context = new ClassPathXmlApplicationContext(
                new String[]{"classpath:context-namespace-test-component-scan.xml"},false);
        context.refresh();


        List list =
                context.getBeanFactory().getBeanDefinitionList();
        // 我自己的工具类,使用json输出bean definition
        MyFastJson.printJsonStringForBeanDefinitionList(list);

        Object bean = context.getBean(PersonTestController.class);
        System.out.println("PersonController bean:" + bean);

    }
}
xml文件如下:
输出:
PersonController bean:PersonTestController(personService=org.springframework.contextnamespace.componentscantest.PersonService@3e11f9e9)
可以看到,注入成功。
我代码里,其实还输出了全部的beanDefinition,我简单整理了一下,一共包含了如下几个:
| beanDefinition中的beanClass |
|---|
| org.springframework.context.annotation.CommonAnnotationBeanPostProcessor |
| org.springframework.contextnamespace.componentscantest.PersonService 我们自己的业务bean |
| org.springframework.contextnamespace.componentscantest.PersonTestController 业务bean |
| org.springframework.context.annotation.ConfigurationClassPostProcessor |
| org.springframework.beans.factory.annotation.RequiredAnnotationBeanPostProcessor |
| org.springframework.beans.factory.annotation.AutowiredAnnotationBeanPostProcessor |
| org.springframework.context.annotation.ConfigurationClassPostProcessor$ImportAwareBeanPostProcessor |
看来,一个简单的注解,背后却默默做了很多骚操作啊,除了自己的业务bean外,还有5个框架自带的bean,类型呢,从命名可以看出,都是些什么PostProcessor,有兴趣的,可以翻到我前一篇,里面讲解了AutowiredAnnotationBeanPostProcessor。
阅读理解
我们从spring-context.xsd文件可以找到这个元素的官方说明。
Scans the classpath for annotated components that will be auto-registered as
Spring beans. By default, the Spring-provided @Component, @Repository,
@Service, and @Controller stereotypes will be detected.


Note: This tag implies the effects of the 'annotation-config' tag, activating @Required,
@Autowired, @PostConstruct, @PreDestroy, @Resource, @PersistenceContext and @PersistenceUnit
annotations in the component classes, which is usually desired for autodetected components
(without external configuration). Turn off the 'annotation-config' attribute to deactivate
this default behavior, for example in order to use custom BeanPostProcessor definitions
for handling those annotations.


Note: You may use placeholders in package paths, but only resolved against system
properties (analogous to resource paths). A component scan results in new bean definition
being registered; Spring's PropertyPlaceholderConfigurer will apply to those bean
definitions just like to regular bean definitions, but it won't apply to the component
scan settings themselves.

See Javadoc for org.springframework.context.annotation.ComponentScan for information
on code-based alternatives to bootstrapping component-scanning.
我用我的425分压线4级翻译了一下:
扫描类路径下的注解组件,它们将会被主动注册为spring bean。默认情况下,可以识别以下注解:
@Component, @Repository,@Service, and @Controller。注意:这个元素隐含了的作用,会默认激活bean class类里的@Required,
@Autowired, @PostConstruct, @PreDestroy, @Resource, @PersistenceContext and @PersistenceUnit 注解,这个功能也是一般默认需要的。将annotation-config属性,设为false,可以关闭这项功能,比如想要自己定制处理这些注解的BeanPostProcessor时。注意:你可以使用在包路径里,使用placeholder,但是只能引用system property。 component scan会导致新的bean definition被注册,Spring的PropertyPlaceholderConfigurer对这些bean,依然生效,但是,PropertyPlaceholderConfigurer 不能对 component scan生效。
如果要基于注解启动component-scan,请查看org.springframework.context.annotation.ComponentScan
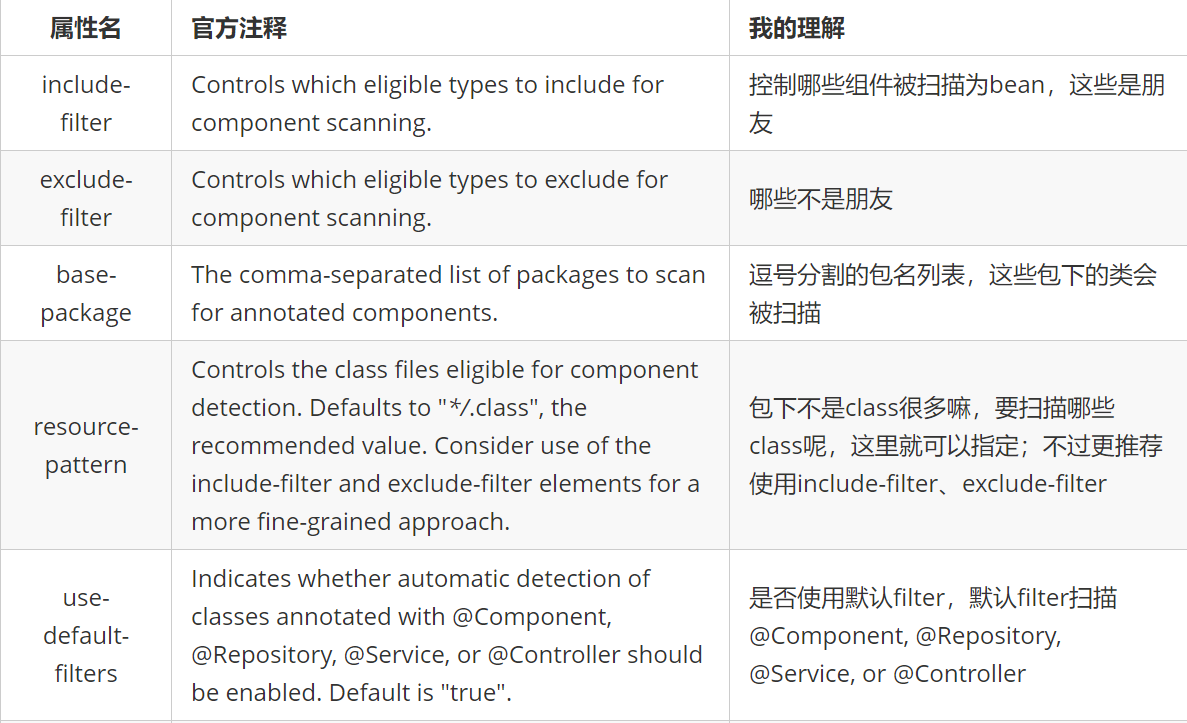
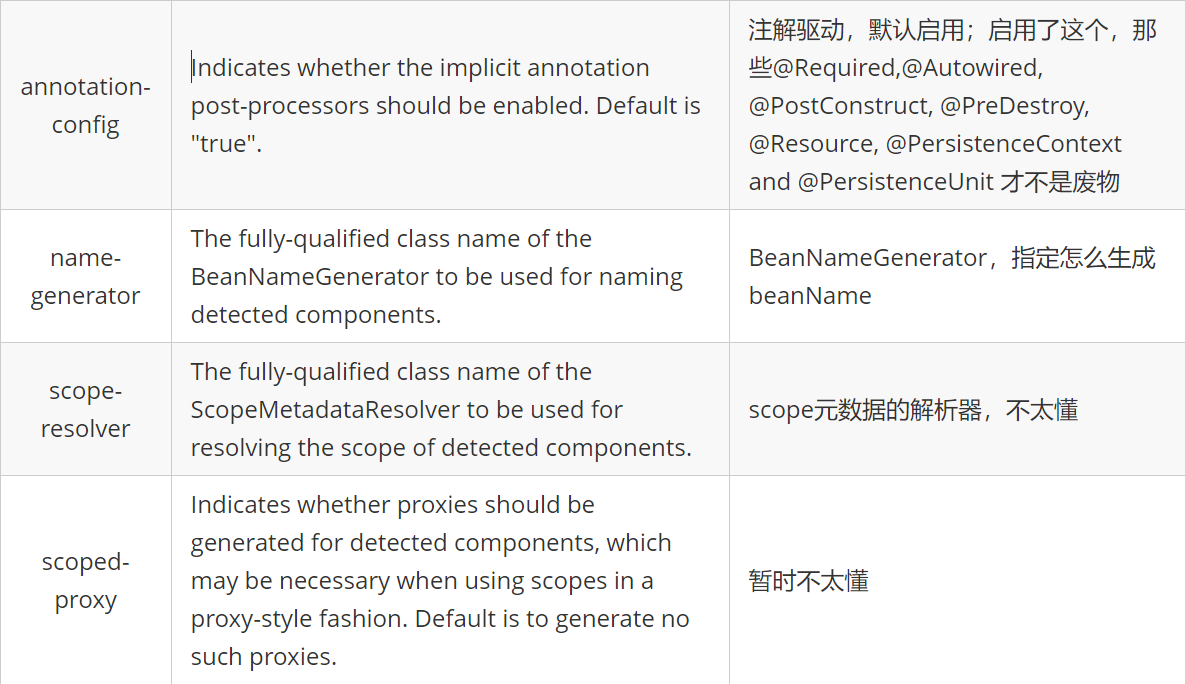
这个只是元素本身的介绍,你知道,这个元素的属性还是有辣么多的,我们用一个表格,来看看其属性的意思:


annotation-config属性的作用
这个属性的意思是,本来,component-scan不是默认包含了的功能吗,所以才能够识别并解析@Autowired等注解,那要是我们关了这个功能,再试试还能不能注入呢?
再次测试,输出如下:
PersonController bean:PersonTestController(personService=null)
可以发现,注入没成功。
而且,这次,我的beanDefinition输出语句显示,一共只有两个beanDefinition,就是我们定义的那两个业务bean。
这么看来,annotation-config的魔术手被我们斩断了,当然,代价就是,不能自动注入了。
use-default-filters属性的作用
本来这个属性的作用吧,从字面上看是说:
Indicates whether automatic detection of classes annotated with @Component, @Repository, @Service,
or @Controller should be enabled. Default is "true".
即:是否自动检测注解了@Component, @Repository, @Service,or @Controller 的类。
后面翻看了一下源码,更加明确了意义:
在component-scan这个元素的解析器里(ComponentScanBeanDefinitionParser),有个属性:
private static final String USE_DEFAULT_FILTERS_ATTRIBUTE = "use-default-filters";
关键代码如下:
    protected ClassPathBeanDefinitionScanner configureScanner(ParserContext parserContext, Element element) {
        XmlReaderContext readerContext = parserContext.getReaderContext();

        boolean useDefaultFilters = true;
        if (element.hasAttribute(USE_DEFAULT_FILTERS_ATTRIBUTE)) {
            useDefaultFilters = Boolean.valueOf(element.getAttribute(USE_DEFAULT_FILTERS_ATTRIBUTE));
        }

        // 1.创建ClassPathBeanDefinitionScanner,下面的 2 3 4 等,代表一步一步跟代码的跳转顺序
        ClassPathBeanDefinitionScanner scanner = createScanner(readerContext, useDefaultFilters);
        ...
    }

    // 2.
    protected ClassPathBeanDefinitionScanner createScanner(XmlReaderContext readerContext, boolean useDefaultFilters) {
        // 3
        return new ClassPathBeanDefinitionScanner(readerContext.getRegistry(), useDefaultFilters);
    }
    // 3
    public ClassPathBeanDefinitionScanner(BeanDefinitionRegistry registry, boolean useDefaultFilters) {
        this(registry, useDefaultFilters, getOrCreateEnvironment(registry));
    }

    // 4
public ClassPathBeanDefinitionScanner(BeanDefinitionRegistry registry, boolean useDefaultFilters, Environment environment) {
         // 5
        super(useDefaultFilters, environment);

        Assert.notNull(registry, "BeanDefinitionRegistry must not be null");
        this.registry = registry;

        // Determine ResourceLoader to use.
        if (this.registry instanceof ResourceLoader) {
            setResourceLoader((ResourceLoader) this.registry);
        }
    }

    // 第5处,进入以下逻辑
    public ClassPathScanningCandidateComponentProvider(boolean useDefaultFilters, Environment environment) {
         // 如果使用默认filter,则注册默认filter
        if (useDefaultFilters) {
            registerDefaultFilters();
        }
        this.environment = environment;
    }
下边就是核心了:
protected void registerDefaultFilters() {
        /**
         * 默认扫描Component注解
         */
        this.includeFilters.add(new AnnotationTypeFilter(Component.class));
        ClassLoader cl = ClassPathScanningCandidateComponentProvider.class.getClassLoader();
        try {
            // 这里可以看到,还支持 ManagedBean 注解
            this.includeFilters.add(new AnnotationTypeFilter(
                    ((Class) cl.loadClass("javax.annotation.ManagedBean")), false));
            logger.info("JSR-250 'javax.annotation.ManagedBean' found and supported for component scanning");
        }
        try {
             // 还支持 javax.inject.Named 注解
            this.includeFilters.add(new AnnotationTypeFilter(
                    ((Class) cl.loadClass("javax.inject.Named")), false));
            logger.info("JSR-330 'javax.inject.Named' annotation found and supported for component scanning");
        }
    }
所以,这个属性的作用就是:假设指定的扫描包内有20个类,其中2个class注解了@component,则这两个类才是真正被扫描的类,至于具体的解析,这个属性就不关心了。
context:exclude-filter属性的作用
为什么不分析context:include-filter,因为假设某个类没有注解@component,按理说,是不加入扫描范围的;
如果我们的include-filter把这个类纳入范围,则还要自定义bean definition的解析逻辑才能将这个类变成bean。
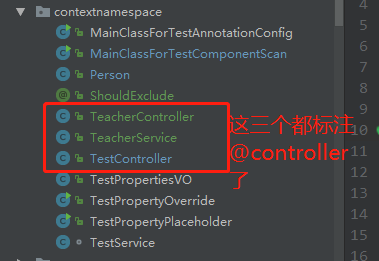
我们这里有个demo,其中TeacherController和TeacherService是注解了ShouldExclude的。

xml如下:
    // 我们这里使用了annotation类型,要把包含了ShouldExclude注解的,全部排除

    // 这里使用regex类型,排除掉TestController
所以,上面的xml,我们可以将3个bean全部排除。
context:include-filter属性的作用
在前面,我们说,这个属性不好测试,但我想到也许可以这样测:
use-default-filters 这里设为false,排除掉默认的@component的include filter;
但是我们在下面,再通过include-filter来达到同样效果。
经过上述改造后,运行正常。
注:以上部分是前两天写的(代码要后边上传,在家里电脑上),以下部分是公司电脑写的,前面的代码在家里,忘记提交了。所以demo会略微不一样,不过不影响实验。
前面我说不好测试,但我发现还是可以搞。我们将会单独定义一个自定义注解:
package org.springframework.contextnamespace;

import org.springframework.stereotype.Component;

import java.lang.annotation.*;

@Target({ElementType.TYPE})
@Retention(RetentionPolicy.RUNTIME)
@Documented
// 大家注意,这里的@component我注掉了
//@Component
public @interface DerivedComponent {

    /**
     * The value may indicate a suggestion for a logical component name,
     * to be turned into a Spring bean in case of an autodetected component.
     * @return the suggested component name, if any
     */
    String value() default "";

}
然后呢,下面这两个类我是使用上面的注解来标注了的:
@DerivedComponent
public class PersonService {
    private String personname1;
}
@DerivedComponent
public class PersonTestController {
// @Autowired
@Resource
private PersonService personService;
}xml如下:
有必要解释下:
use-default-filters=”false”:为true时,会将注解了@component或者@controller等注解的class包含进候选bean;这里设为false,就不会进行上述行为;
:这里呢,类型为注解,注解类就是我们自定义的那个。
总体意思就是,扫描指定包下面的,带有@DerivedComponent注解的类;忽略带有@component等注解的类。
这样设置,我们的测试程序会如何:
PersonController bean:PersonTestController(personService=org.springframework.contextnamespace.componentscan.PersonService@4f615685)
it works!没想到,这样都可以。
我们看看他们的bean definition:
{
        "abstract":false,
        "autowireCandidate":true,
        "autowireMode":0,
        "beanClassName":"org.springframework.contextnamespace.componentscan.PersonService",
        "constructorArgumentValues":{
            "argumentCount":0,
            "empty":true,
            "genericArgumentValues":[],
            "indexedArgumentValues":{}
        },
        "dependencyCheck":0,
        "enforceDestroyMethod":false,
        "enforceInitMethod":false,
        "lazyInit":false,
        "lenientConstructorResolution":true,
        "metadata":{
            "abstract":false,
             // 这里可以看到,注解确实是DerivedComponent
            "annotationTypes":["org.springframework.contextnamespace.DerivedComponent"],
            "className":"org.springframework.contextnamespace.componentscan.PersonService",
            "concrete":true,
            "final":false,
            "independent":true,
            "interface":false,
            "interfaceNames":[],
            "memberClassNames":[],
            "superClassName":"java.lang.Object"
        },
        "methodOverrides":{
            "empty":true,
            "overrides":[]
        },
        "nonPublicAccessAllowed":true,
        "primary":false,
        "propertyValues":{
            "converted":false,
            "empty":true,
            "propertyValueList":[]
        },
        "prototype":false,
        "qualifiers":[],
        "resolvedAutowireMode":0,

        "resourceDescription":"file [F:\\work_java_projects\\spring-boot-first-version-learn\\all-demo-in-spring-learning\\spring-xml-demo\\target\\classes\\org\\springframework\\contextnamespace\\componentscan\\PersonService.class]",
        "role":0,
        "scope":"singleton",
        "singleton":true,

        "synthetic":false
    }
具体原理,下节具体分析,主要呢, 的解析代码,主要就是负责收集beandefinition,
而上面这种自定义注解收集的方式的缺点在于,不能像@component等注解那样,有很多的属性可以设置。我们的自定义注解,只能是使用默认的beanDefinition配置,比如默认单例,等等。当然,你也可以直接使用和@component一模一样的属性,不过那也没啥必要了,对吧。
这部分的源码,我放在了:
最后这个自定义注解的内容,小马哥的spring boot编程思想里也提到了,在161页,我手边没有电子版本,所以抱歉了。
总结
component-scan,用了这么些年,看来真的只是用,里面的原理还是一知半解,经过上面的分析,我也自己系统梳理了一遍。大家看看有啥问题的,欢迎指出来,一起进步。